Lab 8: Git and GitHub at scale
If you missed this lab, please skim the instructions below and study the Git mechanisms involved: branches, pull requests, and merge conflicts. When you visit tutor hours or office hours to make up this lab, we will do a miniature version of it together. To prepare for this, please accept the GitHub Classroom assignment and create a branch named push using the instructions below.
In this lab, you will do a more advanced Git collaboration exercise to learn about forks, pull requests, branches, and how to revert commits. This exercise mimics common collaboration workflows in software engineering. We hope that this exercise will boost your confidence in using Git and prepare you to use it well in future CSE classes and industry!
Do not start your lab report yet. Because of the structure of this lab, you and your teammates around you will share one lab report submission. We will instruct you to start the lab report later.
Lab 8 learning objectives
- Practice pair programming with driver and navigator roles
- Understand the mechanism of branching in Git
- Revert a change introduced by a commit
- Distinguish between reverting and restoring
- Write a pull request to initiate a merge between branches
- Handle merge conflicts as they arise
Table of contents
Intro to Pair Programming
You’ve probably heard the saying “two minds are better than one” at some point. In the field of computer science, this also tends to hold. Thus, today you will be practicing pair programming in a simulated software development task.
In your team of 2 or 3, you will take turns being the driver and the navigator. The driver will be the one at the keyboard doing the coding at the keyboard. Meanwhile, the navigator(s) will be guiding the driver, providing live feedback on what to do next, and pointing out any errors or potential improvements in the driver’s code.
Here are some do’s and don’ts to make your pair programming experience as smooth as possible:
As the driver,
- Do
- Verbalize your thought process so the navigators know your intention
- Listen closely to your navigator’s feedback and adjust when necessary
- Stop coding and plan with your navigator when unsure about how to proceed
- Don’t
- Write long blocks of code without breaks for comprehension
- Ignore your navigator
- Vent your frustrations onto your navigator
- Do your course enrollment second pass in the middle of writing code
As the navigator,
- Do
- Pay attention to every line of code that your driver is writing
- Give feedback to your driver when necessary
- Think about next steps and possible improvements on the driver’s code
- Don’t
- Sit idle and work on other things while the driver is coding
- Backseat your driver and tell them what lines of code to write
- Fight your driver for the keyboard
- Insult your driver’s coding abilities when their code fails to compile
Following the above tips should lead to a more productive and amicable pair programming session.
Icebreaker
You are going to be working in teams in this lab. Please form rows of 6 corresponding to the arrangement of workstations. If necessary, you may switch rows to accomplish this. Within these rows of 6 or 4, form pairs. Going forward, we will refer to your pair as your team.
Once you have finalized the members of your team, elect one member to be the first driver in your upcoming pair programming session. From this point onwards, the driver will be the only one completing actions for the lab on behalf of the team. The first driver should sign into a lab workstation, sign into ieng6 in the Windows Terminal app, and eventually submit the lab report on behalf of your team.
With your partner and group, discuss:
- What is your favorite place that you’ve been to, and why is it the CSE basement?
- If it’s a travel destination, who did you go there with, and when?
EACH DRIVER: Please start the lab report and enter every team member’s email. This lab report is shared amongst your driver navigator pair, so other the navigator(s) should not make their own copy!
Git Better
Branching Out
We are now entering the pair programming phase of the lab. From this point onwards, only the driver should be at the keyboard.
Now, to introduce the task that you will be completing: building an implementation of a stack using linked lists. Of course, such an undertaking would be too much for one lab session, which is why you’ll be splitting up the work amongst your teams.
Each team will be responsible for building one of three features:
- The push operation (which inserts an element into the beginning of the list)
- The pop operation (which removes the first element from the list)
- A function to copy the contents of the stack into an array.
READ the following paragraph very carefully as only ONE person per row creates the github classroom team.
Please wait for your tutor or TA to assign one of the three features to your team. Your tutor or TA should direct the first driver to the GitHub Classroom assignment for this lab to join your row’s repository. Only the first driver needs to accept the assignment!
Hopefully, now your team knows which function to implement. Because it is easy to forget, please ensure that your first driver records your assigned feature in the red dropdown in your lab report. If all the teams started working on the same document, absolute chaos would ensue as everybody is overwriting each other’s changes. Hence, to make working in parallel less painful, we will be using branches.
You can think of a branch as a separate version of a repository that is unaffected by changes pushed to other branches. Each repository starts out with a main branch, which is what you all have been using up until now. If you were to use this approach for our collaborative task, the commit history would look something like this:

Not only is this workflow unorganized, but since there’s no easy way to go back to a previous version of your feature if you realize you made a mistake, you would need to constantly be pulling each other’s changes, which may result in frequent merge conflicts. Let’s see what a workflow with branches would look like:

Now, each team has their own branch to work on their own feature. They can make changes to their branch however much they want to without affecting the work of other teams. When each team is done with their feature, they can simply merge all their changes back into the main branch. You’ll learn how to do this merging process in a future section of the lab. For now, let’s get to work.
First, clone your row’s repository onto your ieng6 account. Then, switch into your repository and run git status to confirm you are indeed in your team’s repository.
To create a branch, run the git branch command like so:
$ git branch branch name here
Replace branch name here with an appropriate name that relates to the feature you have been assigned to implement.
Next, run:
git branch
You should see a list of two branches, one being main, and the other being the branch you just created. You’ll notice that the main branch has an asterisk * next to it. This indicates that the main branch is the branch you’re currently editing. To edit another branch we must checkout the branch. Use the git checkout command like so to check out the branch that you just created:
$ git checkout branch name here
After running the above command, try running git branch again. You should see that you are now editing the branch you just created. This is all well and good, but so far, we have only created a branch on your local machine. In other words, your remote repository on GitHub does not yet know that this new branch exists. To let GitHub know that we want it to track this new branch we just created, we will need to use the git push command with the --set-upstream option like so:
$ git push --set-upstream origin branch name here
Let’s break down this command. The --set-upstream option is telling git that we want to link our branch with the origin remote repository, which in this case, is the remote repository on GitHub. So now, when we push changes while having your branch checked out, they will be pushed to the corresponding branch on the remote repository.
In fact, after running this command, you can check that a new remote branch has been created on GitHub. On the webpage, on the top left corner, open the branch dropdown menu. You should see your branch in the list of branches.
Once you have created a new branch, run the git status command, and put a screenshot of the output on your lab report. Call over a tutor or TA to check off your progress.
Feature Implementation
Do you want to see stack.h and stack.c (or stack_test.c) side-by-side in Vim? You can do that with the :vsplit command in Vim. Run :vsplit other file's filename to open the other file in a vertical split, then press Ctrl+W twice to switch between the two panes.
In your pair programming teams, you will now begin implementing your assigned feature. You may find a description of your feature along with the desired method signature in the stack.h file. Your team will write your implementation code in the stack.c file. While writing this file, the first driver elected from earlier should be at the keyboard, while all other members should be navigators. Feel free to do some light testing during this phase, but you will be writing tests after you implement the feature so prioritize getting the implementation done first. Once your team has finished an implementation of the feature, make sure to commit and push your changes.
You’ll notice that while there is a Makefile in your directory, there is no main function within your stack.c, so as of now there is no way to run your implementation without writing any tests.
Writing Tests
Now that you’ve implemented your feature, you’ll write tests using assert statements to verify that it works (remember Lab 5?). Take a look at test_stack.c as a reference for how main calls tests functions.
The first driver should yield the keyboard to another team member for writing tests. If your team has 3 members, each member other than the first driver should be the driver for at least one test. As a team of 2 or 3, brainstorm and write test cases for stack.c in test_stack.c. Since your tests likely will call functions assigned to other teams, you won’t be able to run the tests immediately. Instead, ask a tutor or TA to verify the correctness of your team’s tests.
When you have at least 2 test functions written, ask a TA or tutor to check your progress. Once checked off, push the test cases to your team’s branch. You don’t need to put a screenshot of this into your lab report.
Reverting Tests
Oops—we forgot to tell you that upper management from the CSE UGCOM (undergraduate committee) has required us to teach the Criterion test framework in this course, and we are running out of time! We would like you to undo the commit in which you wrote your tests using plain assert statements.
Luckily, there is a command in git to do just this—it is called revert. Revert creates a new commit which removes changes made by particular commits. Since you have committed your implementation and tests separately, you can select your commit in which you wrote your tests to revert. You may recall using git restore in Lab 2, but revert is different. To see a comparison between the three commands, look at revert vs restore vs reset.
In order to use the revert command, you must know the hash of the commit you wish to remove the changes of. You can find this by running git log --oneline and locating the hexadecimal string next to the commit’s message. Now in your terminal, type
$ git revert insert commit hash
Git will start Vim with a default message “Revert “writing tests”” for your commit. You can save it as-is and quit Vim immediately. Push this new commit made by revert. Now if you check your files, your tests should no longer be present but your implementation should remain unchanged.
Hold up… The requirement was actually a miscommunication. UGCOM only wanted us to show you some test frameworks that make unit testing more ergonomic than plain assert statements. This means you want to get the tests you wrote back.
To do this, you can simply revert the commit made by your first revert. You can undo your undo, if you will. Repeat the process to get the commit hash of the new commit and use the same command with your new hash:
$ git revert hash for your reverting commit
It will again give you a default commit message which will look like “Revert “Revert “writing tests”””, which you can leave as-is by quitting Vim immediately. Now your tests should be back in your file and your implementation still untouched. Push your reverting and un-reverting commits to GitHub.
Merging with Pull Requests
Your function is now finished, but it is still sitting in your team’s branch. Let’s contribute your function by merging it into the main branch of your row’s repository. Following the GitHub Flow, we achieve this by creating a “Pull request”, a proposal to merge branches where your teammates can provide feedback.
Go to your row’s repository on GitHub.com. Navigate to the “Pull requests” tab, and press the green “New pull request” button near the top right. Near the top of the “Comparing changes” page, you are asked to select which branch to merge from and which branch to merge into. Make sure that the “base” selection is “main” and that the “compare” selection is your team’s branch, which means you are merging from your team’s branch into the “main” branch.

GitHub may report that these branches “can’t automatically merge”. Nevertheless, press “Create pull request”, populate the description box with a short description of your changes, and press “Create pull request” below the box. You have just opened a Pull request!
According to the GitHub Flow, others in your organization can now review your Pull request and write comments as well as request changes. To keep things simpler in this lab, we’ll skip the code review step and defer it to CSE 110. You should see GitHub report conflicts between the two branches in your pull request, but why?

Between the instant when your team’s branch was created and now, main has been updated. To help you out, your TA has written a test in stack_test.c and committed it directly to your row’s main branch. Then, another team has possibly contributed their feature to main already. The diagram above shows a probable state of your repository, where the main branch and your branch have diverged with different changes. When these divergent commits modify the same file, they could pose a conflict when you want to merge them together.
Merge conflicts are often considered the thorniest part of working with Git, but don’t worry! We’re here to guide you through it. Because not all merge conflicts can be resolved through GitHub’s online editor, and because we love the command line (as you already know), we’re going to show you how to resolve this merge conflict in your terminal.
First, Git requires you to set a default strategy for handling conflicts between branches. There are two options: merge and rebase. Atlassian offers a nice, graphical explanation of merging vs rebasing, if you’re interested in the details. In this case, following the “golden rule of rebasing” from Atlassian, we will set the default strategy to merge:
$ git config pull.rebase false
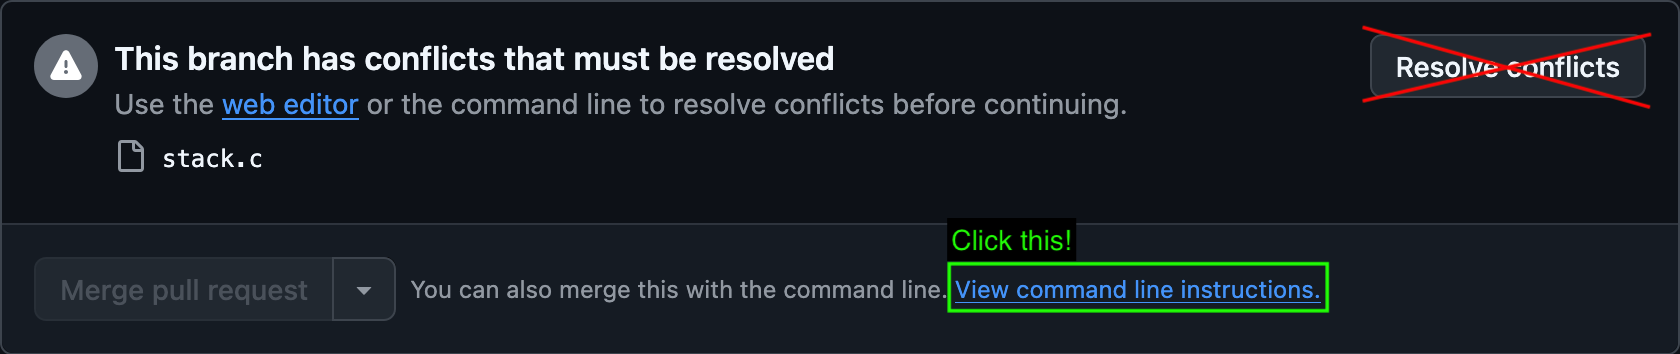
In your pull request, press the “View command line instructions” link near the bottom:
Ensure that you are on the main branch by running:
$ git checkout main
Follow the instructions from GitHub until you see a CONFLICT reported by Git in stack.c and possibly test_stack.c. At this point, Git has edited all the files for which there is a conflict by putting all segments of conflicting changes side-by-side for you to review. Use Vim to review the contents of the files for which Git reported a conflict. Pay attention to how Git distinguishes between your branch’s changes and the destination branch’s changes. Here’s GitHub’s explanation of what’s going on:
To see the beginning of the merge conflict in your file, search the file for the conflict marker
<<<<<<<. When you open the file in your text editor, you’ll see the changes from theHEADor base branch after the line<<<<<<< HEAD. Next, you’ll see=======, which divides your changes from the changes in the other branch, followed by>>>>>>> BRANCH-NAME. In this example, one person wrote “open an issue” in the base orHEADbranch and another person wrote “ask your question in IRC” in the compare branch orbranch-a.If you have questions, please <<<<<<< HEAD open an issue ======= ask your question in IRC. >>>>>>> branch-a
Integrate the changes, and then remove Git’s markers (>>>>>>>, =======, <<<<<<<), ensuring that the file has proper C syntax. Repeat this for each file with a conflict (e.g., test_stack.c). After fixing each file, run git add filename to tell Git that you have finished fixing it.
Once you have finished resolving the conflicts in all files, ask a tutor or TA to check your progress. Then, run git status and put a screenshot of its output in your lab report.
Technically, the instructions from GitHub made you complete a merge in the opposite direction compared to your intention. Your intention is to merge your feature branch into main, but the commands you ran just merged main into your feature branch. Think about how this approach resolves conflicts between your branch and main and why GitHub didn’t tell you to complete the merge in the direction you intended.
Click to show our thoughts on this:
If, instead, GitHub asked you to merge your feature branch intomain in your local repository, you could make whatever change you want while resolving their conflict. You would then push these changes directly into main. However, Pull requests are intended to elicit feedback from your teammates and formalize the process of contributing to the main branch—in other words, it helps teams get another pair of eyes on new code before it gets deployed. Pushing your arbitrary changes to main circumvents this formalized process. While you can technically complete the entire merging process in your local repository and push to main yourself, many large-scale repositories protect the main branch from direct pushes, requiring all changes to go through the Pull request process. By running git add, you have staged changes that resolve the conflict between your branch and main. Commit these changes and push them to GitHub, and refresh the webpage with your Pull request. You should now be able to merge your Pull request, so pretend that your team has reviewed your code, and press “Merge pull request”. Congratulations—you have successfully resolved a merge conflict!
🛑 WAIT
Pause here until every team in your row has merged their pull request into the
mainbranch! Feel free to help the other teams in your row if they get stuck. Optionally, let us know how we can improve this lab through our feedback form. You may also choose to start the Review Quiz.
Finishing up
After the branch from each team has been merged, your row’s main branch will contain all combined stack features and test cases.
Switch to the main branch in your local repository, and run git pull to pull the latest updates from GitHub. Compile your code with make, and execute the combined test suite. If the tests don’t pass, that is okay! You don’t need to make all the tests pass.
Show a TA/tutor the outcome of your tests. Run git log and include a screenshot of its output in your lab report.
The team member that owns your team’s lab report doc should now submit it to Gradescope and add the other members in the team to the Gradescope submission. Everyone (including you!) should make sure that this happens so that you get credit for the lab report.
Review Quiz
As usual, we have a fresh Review Quiz for you this week. It will help you get started on PA 4. :)